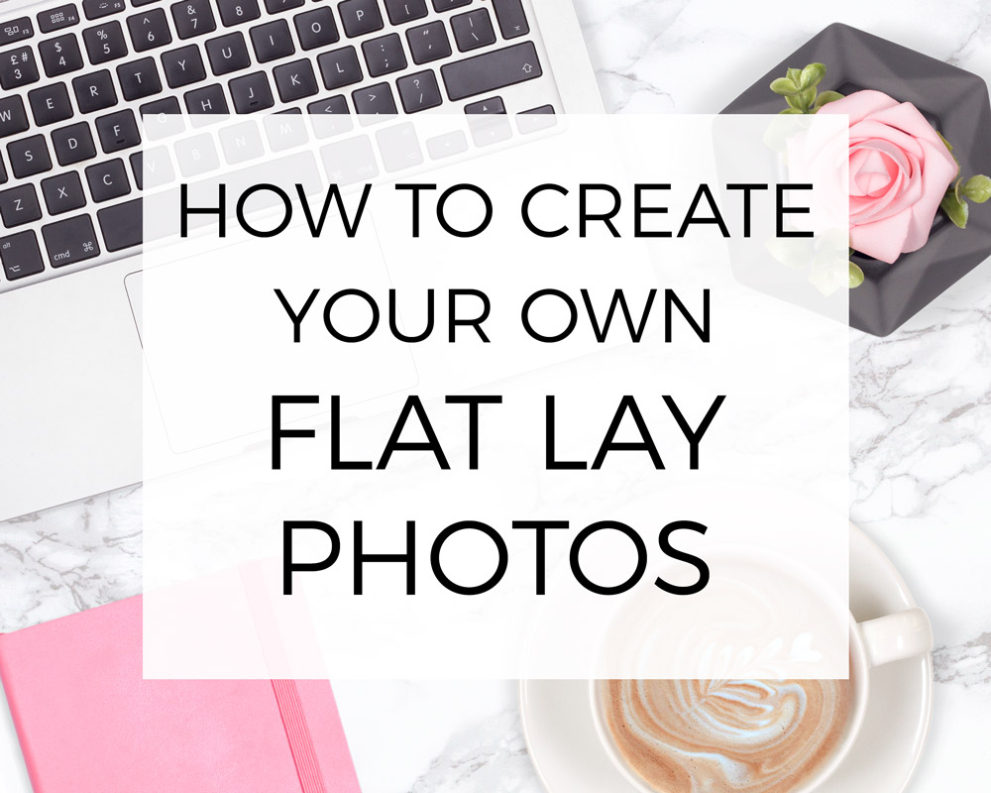
Did you know you can create flat lay photos without picking up a camera or having any props?! In this post I'll show you how you can use a Pixomize Membership to do just this!
Flat lay photos are so popular right now. They're great for Instagram posts, Facebook images, blog posts, cover photos, web design and so much more. The amount of images you need to use for your business each day is huge! But any old flat lay image won't do - it has to be well lit, sharp focus, stylish props and most of all it has to look professional.
I know what you're thinking - not everyone is a professional photographer, and even if you are a whiz with a camera, how are you supposed to have time to run a business/blog/shop AND style and take photos yourself?!
Styled stock photography is perfect for bloggers, entrepreneurs, business owners etc. You get professional, high quality photographs without spending too much time and money. The only issue with stock photography is that other people can use the exact same images as you, and sometimes you just can't find the right image that fits with your blog post or brand.
With Pixomize you can create your own flat lay photos to use on your social media, blog, website etc. It only takes a few minutes and the images will be unique to you! In this tutorial I will show you how to easily create a flat lay styled photograph using Pixomize and the free online photo editing software Photopea (this will work in almost any photo editing program!)
Watch the video tutorial below, or scroll down to find the written step by step instructions with screenshots.
How To Create A Flat Lay Photo - Instructions
1. Go to the library and choose 'top view'
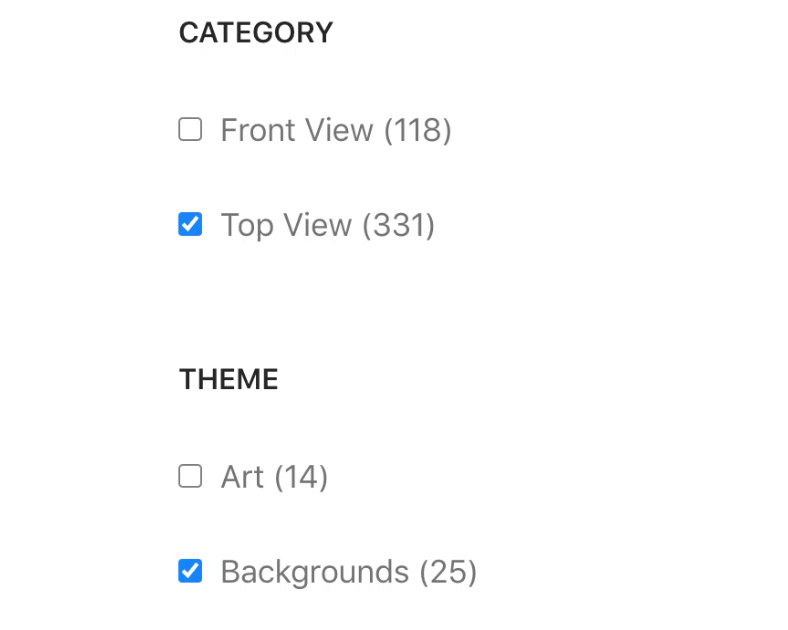
Sign up to a Pixomize Membership to access the library full of digital props and backgrounds. If you are already a Pixomize member, then you can just log in. Once you are logged in, go to the library tab at the top of the menu. Scroll down to the bottom of the page and select 'top view' from the categories. (This section is important as it defines the angle the photograph is taken from, to create a flat lay image we want the photograph to have been taken from a top view angle.)
Then scroll down and select 'backgrounds' from the themes section. Then scroll right to the bottom and press the submit button. All of the top view backgrounds will appear.
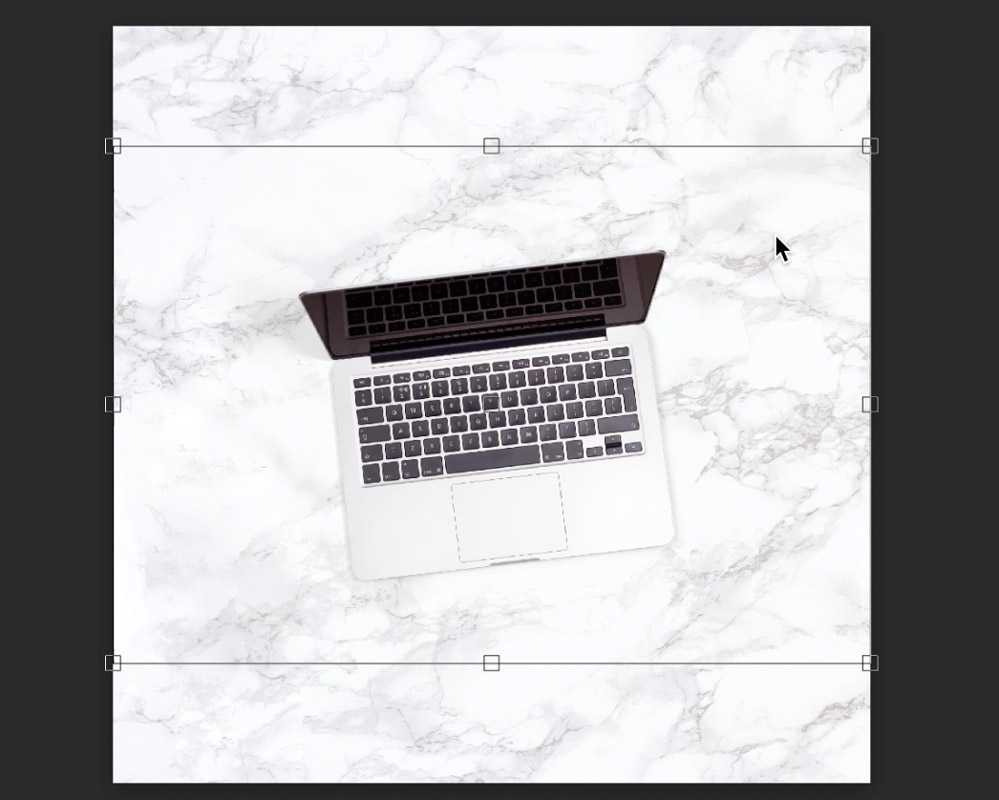
2. Select your background image
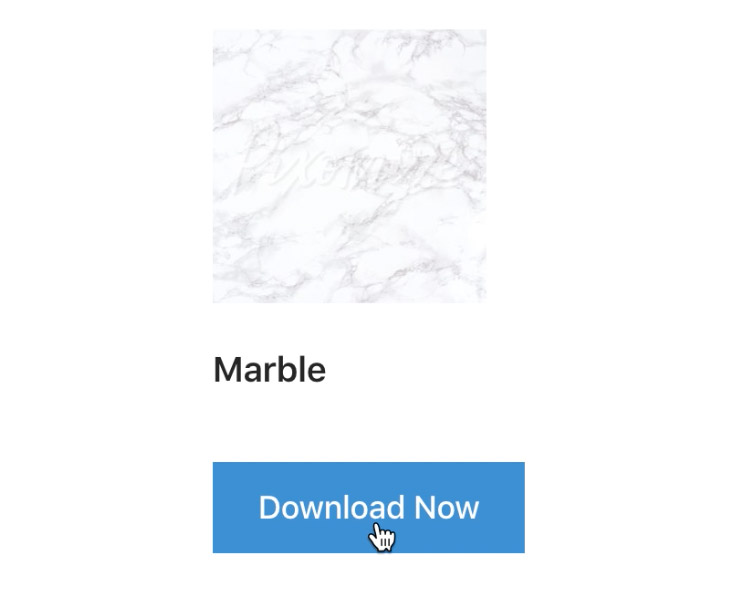
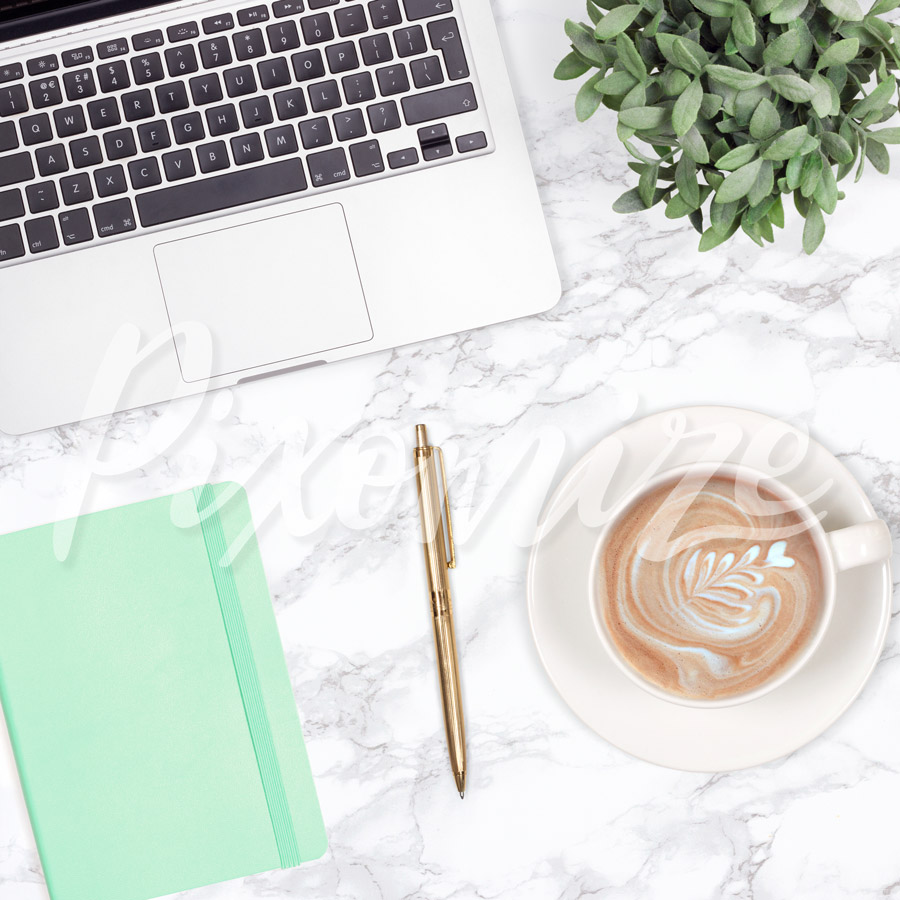
Select the background image of your choice. In this example I decided to use the marble background. To download your background photograph just click on the 'download now' button underneath it and it will download to your computer.
If you would rather a plain background, plain white for example, then you can just open a blank file in your choice of photo editing software.
3. Choose your theme
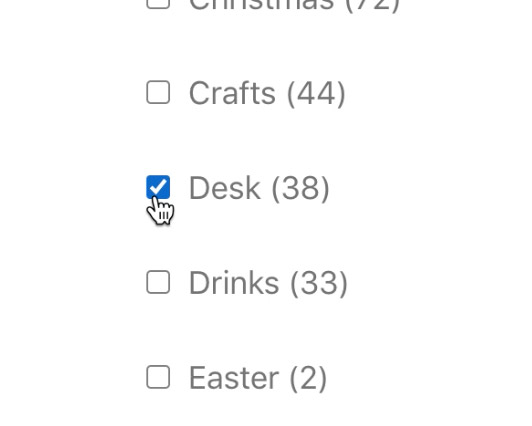
Go back to the library from the menu bar, scroll to the bottom and select 'top view' again. Then you can choose a theme for the props for your flat lay image. I'm going to make a desk themed flat lay so I have selected 'desk', then scroll down and click submit to show all of the top view desk props.
4. Select your props
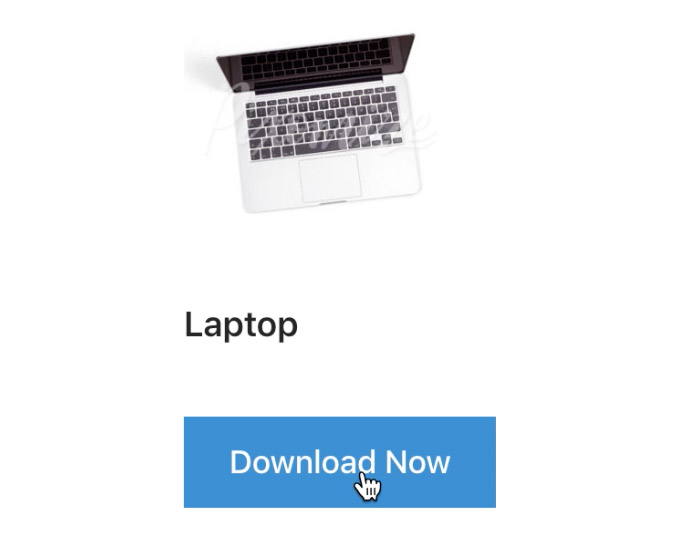
Select the props that you want to use in your image by clicking the 'download now' button underneath them. To create my flat lay I have downloaded the laptop, the green notebook and the gold pen.
You can also add other themed props by going back to the library and repeating the same steps, but selecting a different theme. For example I also downloaded a plant and a cup of coffee.
5. Open the background image in editing software
Open up the background image into your choice of photo editing software. You can do this with most types of editing programs, they just need to be able to work with layers. For this example I have used Photopea, as it is a FREE online editing software. You could also use Photoshop, Photoshop Elements, Pixlr, GIMP etc.
Once you have opened your background, add your first prop to the image. In Photopea you can do this by finding the prop file on your computer and just dragging it into the window on top of the background layer.
6. Move, re-size and rotate the props
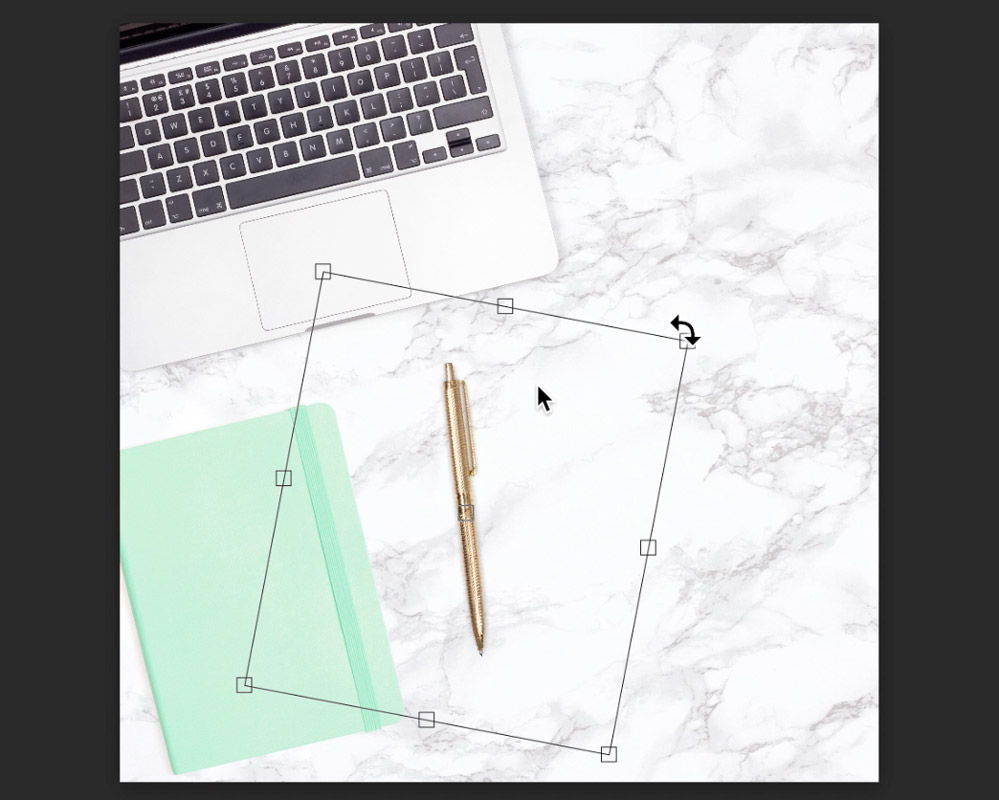
To move, re-size or rotate your prop, go to 'edit' in the top menu, then select 'free transform'. To keep the dimensions of the photo consistent when re-sizing, make sure you hold down the shift button on your keyboard. Move the prop into place, then double click to apply the changes.
Continue to add your props, and re-size, move and rotate them until you are happy with how your image looks.
7. Flatten and save
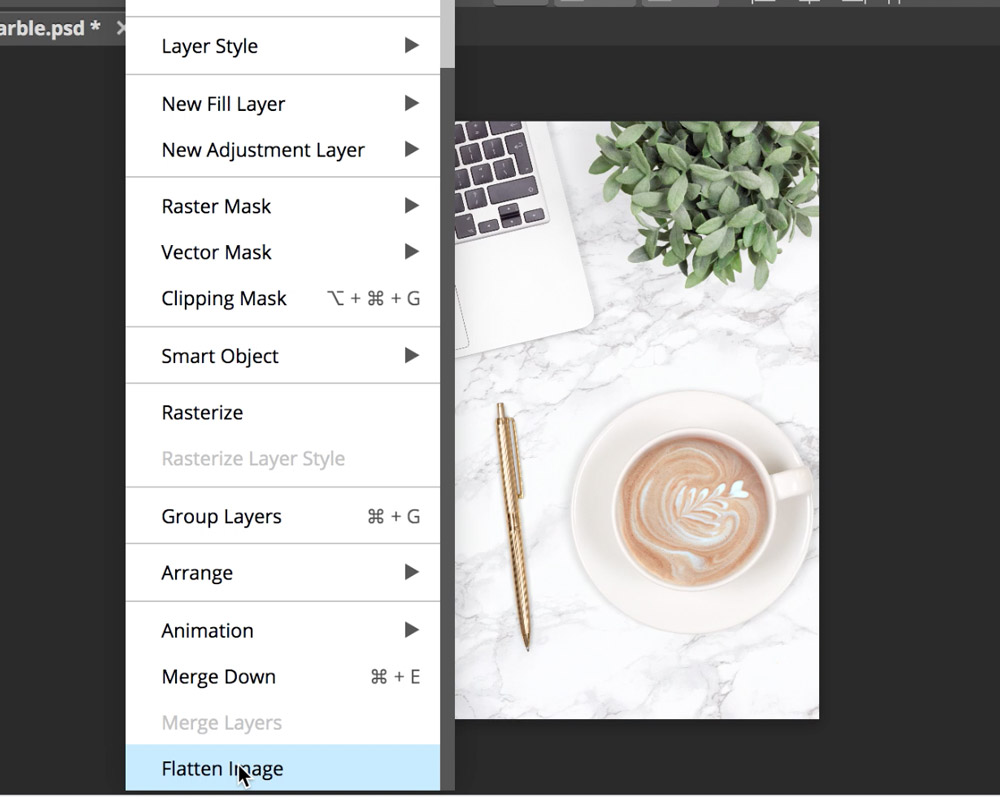
Once you have styled your flat lay props exactly how you want you will need to flatten the layers. Do this by heading to 'layers' in the top menu, and clicking on 'flatten image'. Then save your flat lay photograph and it is ready to use on Instagram, blog posts, your website and more!
You can now use your beautiful custom flat lay photos to improve your Instagram posts, your Pinterest pins, blog posts and so much more!
Did you know with our PRO Membership you can sell the images you create using Pixomize? You can set up your very own styled flat lay photography business without having to buy an expensive camera or lighting, source any props or take any photos! Sign up for our Pro Membership here.
I like the valuable info you provide in your articles. I will bookmark your weblog and check again here regularly. I am quite certain I will learn lots of new stuff right here! Best of luck for the next!
You made a few fine points there. I did a search on the theme and found most people will go along with with your blog.
Great items from you, man. I have be aware your stuff prior to and you’re just too fantastic. I actually like what you’ve obtained here, really like what you’re stating and the way in which through which you say it. You make it enjoyable and you continue to care for to keep it wise. I cant wait to read far more from you. This is actually a terrific site.
Thank you for your lovely comment, I’m glad you enjoyed the post!
Hi mates, how is all, and what you want to say on the topic of this
article, in my view its actually amazing designed for me.
Fantastic blog! Do you have any suggestions for aspiring writers?
I’m planning to start my own site soon but I’m a little lost on everything.
Would you advise starting with a free platform like WordPress or go for a paid option? There are so many options out there that I’m
totally confused .. Any ideas? Thank you!